


How to Stencil a DIY Throw Pillow Cover
Welcome to another DIY tutorial from Oak Lane Studio. In this stencil tutorial we show you how to decorate a fabric throw pillow cover. Throw pillow stenciling is an easy, budget-friendly DIY home décor project, and a great introduction to stenciling if this is your first stenciling project.
In this How to Stencil Tutorial, we share basic how to stencil techniques, as well as how to stencil on fabric and how to paint on fabric. Scroll down to watch our how to stencil a throw pillow video tutorial.
For this stenciling project, we used our farmhouse style Gather Here pillow stencil template. You can stencil a pillow with almost any stencil template (provided it fits on your pillow). You can also stencil a pillow with an accent stencil, or even a wall stencil, find the stencil template that fits your own décor style.
Supplies for Stenciling a Throw Pillow
- A Pillow Case
- A Pillow Stencil Template
- Repositionable Spray Adhesive
- Americana Burnt Umber Acrylic Paint
- Americana Fabric Painting Medium
- White Bristle Stencil Brush
- Frog Painter's Tape*
How to Stencil a Throw Pillow
Practice Stenciling First
Stenciling is not the same as painting. A key difference between stenciling and painting is the minimal amount of a paint you use to stencil. Before you begin your stenciling project, we always recommend practicing your stenciling technique on a piece of cardboard or fabric, especially if this your first time stenciling. The Dry Brush Technique, or stenciling with a bare minimum of paint (explained in Step 4) is key to stenciling, as stenciling with too much paint will cause paint to seep under the stencil and blur the design (this is also known as "Paint Bleed"). To stencil, you will swirl, stipple or roll multiple, faint layers of paint until the color has gradually reached the shade you prefer. Practice your stenciling technique first to get a feel for how little paint you actually need for stenciling.
How to Prepare a Pillowcase for Stenciling
Washing the pillowcase: If you plan to wash the pillowcase you are going to stencil in the future, be sure to wash the pillowcase before you stencil. You do not want the pillowcase to shrink after you have stenciled it, so make sure the fabric has been washed a dried before you stencil. If you do not plan to wash the pillowcase, you can skip the first part of this step and start by securing the fabric to a firm surface.
Secure the pillowcase to cardboard: No matter what project you are stenciling, it is important to always stencil on a smooth, stationary surface. (It would actually be very difficult to stencil on an uneven and unsteady surface). When stenciling fabric, the first step is to secure the fabric to a hard surface, such as a piece of cardboard, which will hold the fabric in place while you stencil.


Spray the back of the pillow case (whichever side you will not stencil) with our Repositionable Spray Adhesive. Hold the spray can 6 to 8 inches away from the pillowcase to spray, and keep you mouth closed while spraying. Wait 30-60 seconds after spraying the pillowcase before you position it on the cardboard. Our adhesive spray is very strong, and if you don't wait at least 30 seconds you may have trouble removing the pillowcase from the cardboard after you finish stenciling.
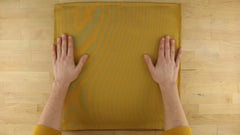
Smooth the pillowcase over the cardboard to remove any wrinkles or bumps and press it firmly into the cardboard. Then, use a lint roller or masking tape to clean dust off the pillow case. Dust will prevent the stencil template from fully adhering to the pillowcase, which might cause paint bleed.
How to Position the Stencil Template on the Pillow
Now it is time to position the stencil template onto the pillowcase. First, spray the back of the stencil template with our Repositionable Adhesive Spray, just as you sprayed the pillowcase in Step 1. Make sure you do this away from the pillowcase, as you do not want the front of the pillowcase to be sticky too. Again, wait 30 to 60 seconds after spraying to place the stencil template onto the pillowcase.

Firmly press the stencil into the fabric, and make sure that the none of the cut out edges are sticking up and that the stencil lays flat on the pillowcase. Tape around the outer edges of the stencil template with Frog Painter's Tape (this is the gentlest painter's tape and least likely to remove paint when you peel it off). Now it is time to mix your paints.
How to Mix Fabric Paint
To stencil on fabric, we recommend mixing Americana Acrylic Paint with Fabric Painting Medium. The Fabric Painting Medium will make the acrylic paint machine washable, so you do not have to wash and dry the pillowcase by hand.

On a paper plate, mix 2 parts American Acrylic Paint with on part Fabric Painting Medium (ration 2:1). You do not need to measure this ratio exactly, a roughly estimate pour will do. Now for stenciling.
How to Stencil a Pillow with the Dry Brush Technique
Now the paint is mixed, it is time to stencil!
Stenciling is not painting, the key difference between stenciling and painting is that amount of paint you use to stencil. Stenciling with too much paint will seep under the stencil and cause paint bleed, so it is very important to stencil with a dry brush (the Dry Brush Technique).


Start by swirling or dipping your stencil brush in your mixed paint, then dab the excess paint off onto a paper towel. The Dot Test is a good way to see if you have to right amount of paint for stenciling, follow the steps below until you have a dry brush and are ready to stencil.
The Dot Test for Stenciling:How to check that you have the right amount of paint to stencil with a paint brush. |
|
With your dry brush, begin stenciling by swirling or stippling paint over the stencil design (do not stencil in brush strokes). Even though the first layer of paint will be very faint, resist the urge to add more paint to your brush until necessary. Color will gradually build in many thin coats of paint. For fabric stenciling, 5 to 6 layers of paint is normal, although you can stencil fewer layers of paint to create a vintage, distressed look.


You may need to use the slightest pressure as you swirl paint through your stencil, but do not press too hard or else you risk forcing paint beneath the edges of your stencil template (this is paint bleed).
One of the benefits of stenciling is how much you can personalize your home décor. If you are envisioning brightly colored throw pillows that add a pop of color to the room stencil a few more layers of paint until you achieve the saturation you hoped for. If you prefer a subtle, distressed style for farmhouse style décor, stencil fewer layers of paint.
How to Clean and Reuse a Stencil Template
When the paint color has reached your desired saturation and the paint has dried, gently remove the Frog Painter's Tape and the stencil template. Wait 24 hours for the paint to cure before washing your stenciled throw pillow.


Our stencil templates are easily washable and reusable! For this stenciling project, we stenciled with water based paint which is exceptionally easy to clean. To clean the stencil template, first soak it in hot water for five minutes, this will loosen any paint that has dried on the stencil. Then wipe away all the remaining paint with a cloth and store the stencil for future DIY stenciling projects.
For more information on how to clean stencil templates, please see our FAQ page.
Watch our How to Stencil a Pillow Video Tutorial:
* A note on our stencil supplies:
We prefer Frog Painter's Tape to any other painter's tape. Frog tape is an effective adhesive and gentler than other painter's tape, so it is less likely to peel off paint when you remove it from your project.
Pillow stenciling is an easy, budget-friendly, DIY home decorating project. Whether you are decorating a new home, or doing a room makeover, stenciled throw pillows are an excellent way to add color, style and interesting décor to your home. Pillow stenciling is a great Ikea hack and a wonderful DIY home improvement project. If you are tired of a dull room, or want to add some style and color to your couch or bed, stenciled pillows are a stylish home accent.
Learn more about how to stencil your home and create beautiful home décor in whatever style you like. Visit our Stenciling Blog, or Video Gallery for how to stencil tutorials and projects tips. Peruse our home décor stenciling projects Photo Gallery for ideas and inspiration on how to use stencil templates to decorate your home.
Go decorate your couch or bed with your DIY stenciled throw pillow!