


How to Stencil a Concrete Floor with Patio Paint
In this DIY stenciling project tutorial, we will walk you through how to stencil on concrete floors. We will demonstrate basic stenciling techniques as well as specific how to stencil on concrete tips, including a unique sand in paint technique for stenciling on concrete.
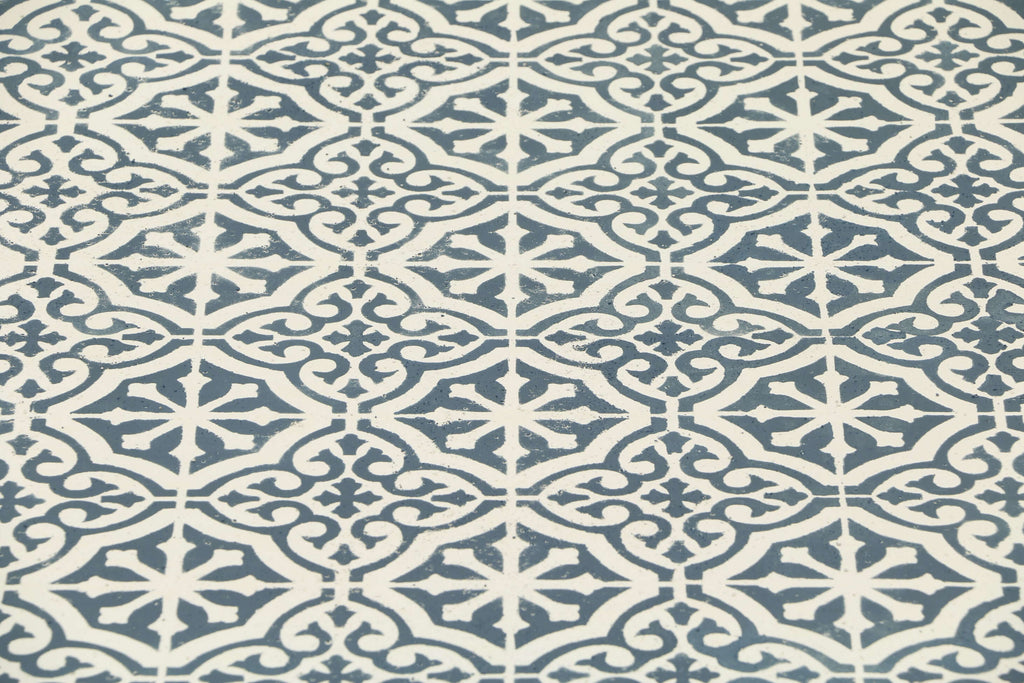
For this DIY home décor project, we used our Bohemian Tile Wall Stencil template. You can use any home décor stencil template to stencil on concrete. If you want to stencil an entire floor, we recommend repeating pattern, allover stencil templates.
Stenciling Supplies Concrete or Patio Floor Painting
- Wall and Floor Stencil Template
- Patio Floor Paint*
- Large High Density Foam Roller
- Repositionable Spray Adhesive
- Frog Tape Painters Tape
- Paint Roller Tray
*Make sure you have the right paint for your floors. Visit your local paint store and tell them about the floor you want to stencil. Patio Paint is formulated to withstand weathering and is water resistant. It is perfect for painting outdoors and painting on wood, concrete and terra cotta.
How to Stencil a Concrete Floor or Patio
Practice Stenciling First
Stenciling is a little different than painting, but just as fun! The most common stenciling mistake is stenciling with too much paint which causes paint to bleed under the stencil. It is very important to stencil with the Dry Brush Technique (explained in below in Step 4). We always recommend practicing stenciling on a piece of cardboard before beginning a project, especially for first time stencilers, so you can get a feel for how much paint you need to stencil.
How to Prepare your Concrete Floor for Stenciling

Begin by sanding away any stubborn bumps and irregularities, such as paint, dirt, or plaster from the concrete floor you want to stencil. A smooth surface is very important for stenciling, because paint will pool around any bumps and mar the stencil design. Next, clean the floor with a damp cloth. (A Swiffer works great too).
How to Prepare your Patio Floor Paint for Stenciling
We use our sand in paint technique when stenciling or painting concrete floors. The sand in the paint resurfaces the concrete floor with a textured, non-slippery coating, which makes the floor easier and safer to walk on, much like a bathtub mat. You don't have to add sand to your floor paint, unless the paint you are using will make the floor more slippery.
For this project we mixed DecoArt Patio Paint colors Cloud White and Antique Mum for our base paint to paint a base layer on our concrete floor.
Pour some paint into the painter’s tray and then mix sand into the paint. For every cup of paint mix in ¼ cup of sand (ratio 4:1). To make clean up easier, we lined our painter’s tray with a garbage bag.
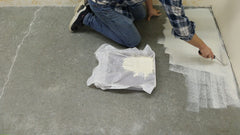
How to Paint a Basecoat on Concrete
Paint a base coat on the concrete floor using a foam paint roller and the textured paint mixture. Use a paint brush to paint along the edges and corners of the floor. Once you have 1-2 coats of texturized paint, paint another 1-2 coats of paint without sand to seal in the textured paint. Let this base coat dry for a few hours or a day before stenciling.
How to Prepare the Stencil Template
Spray the back of your stencil with our Repositionable Spray Adhesive. (Keep your mouth closed while spraying). Wait 30 to 60 seconds before positioning the stencil onto the floor.

Position your stencil in the center of your floor and firmly press all the edges of the design onto the concrete, making sure that no edges are sticking up. With your stencil in place, place small pieces of Frog Painter’s Tape under the 4 triangular registration marks in the corners of your stencil design. These markings will help you reposition the stencil later. Use longer strips of painter’s tape on the edges of your stencil.

(In the image above, you can see a small piece of tape underneath one of the Registration Marks in the top corner of the stencil template).
Before you position the stencil, map out how you want to stencil along your floor. You can start in a corner, and stencil outwards. Or you can start stenciling in the middle of your floors. Before you stencil, get an idea for where the stencil pattern is going to end, and how that will look.
How to Stencil on Concrete with a Dry Roller
Mix some of your stenciling paint with sand (1 cup paint for ¼ of sand) in the painter’s tray. For this project we mixed DecoArt Patio Paint in Robins Egg Blue and Wrought Iron Black to create a deep, slate blue color.
Stenciling is not painting, the key difference is that amount of paint you use to stencil. Your brush or roller should be almost dry to the touch when you stencil, otherwise excess paint will seep under the stencil and cause paint bleed.
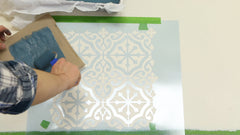
To stencil, first roll your paint roller in the paint, and then roll out as much excess paint as you can onto the paint tray or a piece of cardboard. To check that you have the right amount of paint for stenciling, press your finger into the paint roller. If paint wells up around your finger you have too much paint to stencil, continue rolling paint onto the painter’s tray.
If you are stenciling with a paint brush (i.e. in the corners), the Dot Test is a good way to see if you have to right amount of paint for stenciling.
The Dot Test for Stenciling:How to check that you have the right amount of paint to stencil with a paint brush. |
|
To stencil, roll several light coats of paint over the stencil, although the first coat may seem very faint, color will gradually build as you add more layers of paint.

If you are stenciling with a paint brush stipple or swirl paint onto the stencil design instead of using brush strokes. Before you finish, paint the registration marks onto the painter’s tape beneath the stencil.
How to Reposition the Stencil Template on Concrete
Once the paint is dry, gently remove the tape and stencil from the floor, but leave the tape with the registration marks on the concrete. You will not need to respray the stencil with Repositionable Adhesive Spray when you reposition it. If the stencil loses some of it’s tackiness, gently while the sticky side with a slightly damp cloth to remove any dust. If this does not work, then respray the stencil.


To reposition the stencil, line the registration marks of your stencil up with stenciled registration marks of your first stencil repeat (painted on the frog tape). Part of the stencil design overlaps between the registration, use this as a guide when aligning the stencil with the previous section. Press the stencil design edges into place before stenciling the next stencil repeat. Repeat this step until you have stenciled the entire floor.

Do not remove the frog painter’s tape with the registration marks until your have stenciled the entire floor.
How to Stencil a Concrete Floor in Edges and Corners
Stenciling corners and edges might be easier with a paint brush. Whatever you use to stencil, be sure to use the Stenciling Dry Brush Technique in step 4.

Align the stencil with the adjacent registration marks and bend it against the wall to stencil into the corner where the wall meets the floor. Firmly press the stencil into the corner. Roll the paint through the stencil in a straight line along the edge of the wall. To stencil right up into the corner, use painter’s tape along the bottom of the wall, then fold the stencil and paint right into the corner.


To stencil the floor into a corner, start by lining the registration marks up on both sides of the stencil. Bend the stencil in on itself and tape the top of the stencil onto the wall. Roll the paint along the edges of the corners.
How to Seal your Stenciled Floor
When you have finished stenciling your concrete floor, seal the paint with a clear finish or sealer (you can use matte or shiny finish, whichever you prefer) to protect the stenciled design. If you don't seal the floor, the paint will eventually wear away with use.
How to Clean Your Stencil Template
Once you have finished stenciling, gently peel the stencil and all the tape off of the floor. Wash your stencil, paint rollers and brushes. For specific instructions on how to wash stencils, please see our FAQ page.
Stencil templates are a creative, budget-friendly DIY home décor tool to personalize your home and add a fresh spot of color and personality to ordinary spaces. Whether you want to brighten up a laundry room floor, redecorate your basement, patio or even a garage workspace, stenciling your concrete floors will instantly liven up the room!
Stenciled floors make a beautiful addition to home décor. Floor stenciling adds visual texture and interest to an otherwise bare space, and can transform the style and atmosphere of your rooms. You can also stencil tile designs on your floors with our patio stencil templates and tile stencil templates.
Find DIY home décor stenciling ideas and inspiration in our Photo Gallery.