


How to Stencil a Lampshade
In this DIY How to Stencil a Lampshade Tutorial, we will show you how easy it is to stencil a lampshade. Whether you want to upgrade a boring Ikea lamp, upcycle a vintage garage sale find, or just try something new, lampshade stenciling is an easy, budget friendly DIY home improvement project. In this How to Stencil tutorial, we will cover basic how to stencil techniques, such as how to avoid paint bleed, and how to stencil repeating patterns, as well as tips for how to stencil on fabric.

For this lampshade stenciling tutorial, we stenciled our Burmese Ikat Wall Stencil Template, which is a repeating pattern wall stencil. If you prefer a simpler lampshade, you could stencil with a border stencil template, or a single accent stencil template. Scroll down to watch our How to Stencil a Lampshade Video Tutorial.
Stenciling Supplies for Painting a Lampshade:
- Lampshade Stencil
- Repositionable Spray Adhesive
- Frog Tape Painter's Tape
- Long Handle Stencil Brush
- Americana Acrylic Paint
Practice Stenciling First
We always recommend practicing your stenciling technique on a piece of cardboard or fabric before beginning your stenciling project, especially if this your first time stenciling. The Dry Brush Technique, or stenciling with a bare minimum of paint (explained in Step 3) is key to stenciling, as stenciling with too much paint will cause paint to seep under the stencil and blur the design (this is also known as "Paint Bleed"). To stencil, you will swirl, stipple or roll many faint layers of paint until the color has gradually reached the shade you prefer. Practice your stenciling technique first to get a feel for how little paint you actually need for stenciling.
How to Prepare the Lampshade for Stenciling
Before you begin stenciling, it is important to clean the lampshade, as dust and dirt will prevent the stencil template from sticking firmly to the lampshade. We recommend using a lint roller or some masking tape to quickly remove all dust that might be on the lampshade. This step is important for a high quality finish.
How to Position the Stencil Template on the Lampshade
Start out by spraying the back of your Burmese Ikat Wall Stencil with our Repositionable Spray Adhesive.

Hold the can 6-8 inches from the back of the stencil and face away from the lampshade to apply a light coat of the Repositionable Spray Adhesive. Keep your mouth closed while spraying. Wait 30 to 60 seconds for the stencil to become tacky before positioning the stencil template on the lampshade.


Line the stencil template up with the seam at the back of the lampshade and press the stencil template firmly into the lampshade until it lies flat and smooth against the lampshade. Make sure that none of the stencil design cutouts are sticking up otherwise the stencil design will not transfer properly.
If you are using a allover repeating pattern stencil, place four small pieces of Frog Painter's Tape under the registration marks in the four corners of the stencil template. These marks will help you align the stencil when you reposition it. If you are using an accent stencil, or if there is not enough room for the entire stencil template to be on the lampshade you may skip this step.
Then, tape the outer edges of the stencil template to the lampshade using Frog Painter's Tape. We prefer using Frog Painter's Tape when stenciling because it is the most gentle tape and will be less likely to remove paint when you peel it off.
How to Stencil with the Dry Brush Technique
Stenciling is not painting and the key difference is that amount of paint you use to stencil. Your brush or roller should be almost dry to the touch when you stencil, and yes, we really do mean dry. If you stencil with too much paint, the excess paint will seep under the stencil template and blur the stencil design, this is called paint bleed.
Before stenciling, use the "Dot Test" to be sure you have the right amount of paint for stenciling.
The Dot Test for Stenciling:How to check that you have the right amount of paint to stencil with a paint brush. |
|


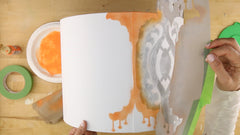
Prepare to stencil by pouring some Americana Acrylic Paint (we used the color Pumpkin) onto a paper plate. Use the Dot Test to determine when you have the right amount of paint to stencil, then begin by swirling or stippling the paint into the stencil template design. (Do not use brush strokes when stenciling). Place one dot of paint on the frog tape beneath the registration marks.

When you first start to stencil, you should only see the faintest hint of color being applied, this is normal, resist the urge to dip your brush in more paint. Paint color will gradually build as you apply more coats of paint, one after another until you have the color saturation you hoped for.
One of the benefits of stenciling is that you have the opportunity to personalize your home décor. If you are hoping for a bright, vibrant pop of color on your lampshade, you can create that effect by stenciling a few more layers of paint. If you prefer a subtle, distressed or elegant farmhouse style of home décor, simply stencil fewer coats of paint. Stencil the lampshade you want most in your home.
How to Reposition the Stencil Template on a Lampshade
Once you have finished stenciling the first repeat of the pattern it is time to reposition the stencil template. Wait until the paint has dried and then gently peel off the painter's tape and the stencil template. Leave the tape pieces with the registration marks on the lampshade.
Realign the stencil template registration marks with the marks you just painted. If you did not use registration marks, align the stencil template with the previously stenciled design and make sure the stencil template is straight.


You do not need to respray the stencil every time you reposition it. If the stencil seems to be less sticky than it should be, try cleaning the back of the stencil template (the sticky side) with a slightly damp cloth to remove any dust. If the stencil template still will not stick to the lampshade you can respray the stencil. Once the stencil is in place, re-tape the stencil template with Frog Painter's Tape.
Continue to stencil with the dry brush technique until you have stenciled the entire lampshade.
How to Clean the Stencil Template
When the paint color has reached your desired saturation and the paint has dried, gently remove the Frog Painter's Tape and the stencil template.
Our stencil templates are easily washable and reusable and water based paint, such as acrylic paint are easy to clean off the stencil. Clean the stencil template by soaking it in hot water for five minutes and then use a cloth to clean the acrylic paint off the stencil template and store the stencil for future use.
For more information on how to clean stencil templates, please see our FAQ page.
We offer stencils in various sizes, from repeating pattern wall stencils, to border stencils and home décor accent stencils. Depending on the size of your lampshade, you can use almost any home décor stencil template to stencil a lampshade, so find the stencil pattern that suits both your home décor style and your lampshade size.
See our How to Stencil a Lampshade Video Tutorial:
Have you ever walked into a room and thought "I love that lamp!" We have too. An interesting lamp or decorative lampshade can elevate the décor of any room and add texture or style intrigue to mundane décor. Unfortunately, the perfect lamp or lampshade you spy in the store often won't fit in the budget. At Oak Lane Studio, we believe that you home décor style shouldn't be sacrificed for a budget. With some paint, the right stencil template and a touch of styling creativity you can handmake your favorite home décor pieces without maxing out your budget.
Lampshade stenciling is an easy DIY home décor project that adds personality and color to any room. Whether you are redecorating a kids bedroom, creating a DIY home office, or just want to refresh you home décor, stenciling a boring lampshade is a great way to refresh your home décor.