


How to Stencil a Frame | Custom Stenciled Framed Mirror Project | Oak Lane Studio
You'll be seeing double smiles when you give them this Custom Stenciled Framed Mirror Project from Oak Lane Studio!
This DIY project creates the perfect wedding gift that your favorite bride and groom will love forever.
Here's what you'll need:

- Custom Stencil Designer
- Americana Acrylic Paint
- Shimmering Silver
- Repositionable Spray Adhesive (optional)
- Americana Acrylic Sealer (optional)
- Stencil Brush
- Wide-framed mirror (or picture frame)
- Paper Plate
- Paper Towel
Placing Your Stencil


If your frame is glossy, you'll need to paint it first with a paint/primer combination in order to create a surface suitable for the acrylic paint to stick to.
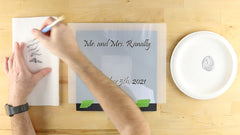
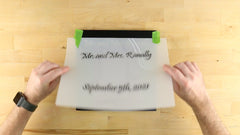
Next, place your custom stencil from Oak Lane Studio so that the top line is positioned over the top of the frame. Affix with Frog Tape painter's tape.
If you find that it isn't laying perfectly flat against the frame surface, you may choose to use some Repositionable Spray Adhesive on the backside of the stencil. See the can for specific instructions.
Preparing to Stencil


Stenciling
Pour out some Americana Acrylic Paint onto a paper plate. Coat the paint brush thoroughly with paint. To avoid stencil bleeding, remove excess paint by swirling the brush on a stack of paper towels.


Apply the color in light coats using the same swirling motion through the stencil. Wait a minute or two between coats.
Continue until you've applied five to ten light coats and the color is full and even. Once you've finished with the top line, remove the stencil and give it a minute or two to dry.


Re-position the bottom line so that it it's centered on the lower frame. Repeat the painting process from the top line.
Once you've finished, remove the stencil to reveal your custom stenciled framed mirror!
If desired, protect your personalized frame by carefully covering up the mirror and adding a coat or two of Americana Acrylic Sealer.
