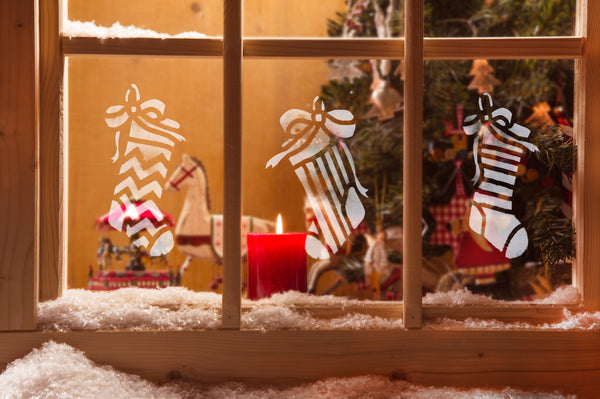
How to Decorate Windows for Christmas | Christmas Stockings Window Stencil Project
Yours will be the jolliest house on the block with this Christmas Stockings Window Stencil from Oak Lane Studio!
How do you stencil on windows?
Oak Lane Studio has everything you need to stencil on windows. We have an incredible selection of stencils, stencil brushes, stencil adhesives, snow frost spray, and any color paint you can imagine. We can also make any custom stencil using your design!
How do I attach a stencil to glass?
There are multiple ways to attach stencils to glass. We recommend using a combination of our Repositionable spray adhesive, which you spray directly onto the stencil itself, and some Frog Tape painter’s tape for extra protection around the edges.
What can I use to stencil on glass?
We off a wide variety of stencils for all occasions and themes, including all the major holidays and all four seasons! You can also call us or visit our website, OakLaneStudio.com to order a custom stencil using your own design or text!
Can you stencil paint on glass?
Absolutely! You can easily stencil any of our dozens of colors of acrylic paints (or a mixture of colors) simply by adding a little dish soap to the paint. This allows the paint to be easily washed off when it’s time to stencil a new design.
Do you pull stencil off wet or dry?
Stencils and any additional masking materials should be removed while the paint or window frost spray is still wet. This allows for easier removal of the stencil and also helps to keep the edges of your designs nice and crisp!
Here's what you'll need:

- Christmas Stockings Window Stencil
- Americana Acrylic Paint
- Santa Red
- Mistletoe
- White
- Gold Metallic
- Silver Metallic
- Santa SnowFrost
- Repositionable Spray Adhesive
- Stencil Brushes
- Frog Tape Painter's Tape
- Dawn Dish Soap
- Paper Plates (or paint tray)
- Paper Towels
- Scrap Newspaper
Preparing the Stencil


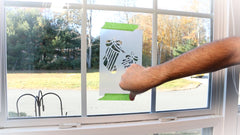

Once you've chosen your window, take your stencil and spray the backside with some Repositionable Spray Adhesive.
Wait 30 seconds, then position the stencil on the window. Use some Frog Tape painter's tape to help secure it in place.
Next, if desired, use small pieces of Frog Tape to mask off the stencil elements that you will be painting the first color.
Preparing the Paint and Stenciling the Red Stencil Elements


After shaking your bottle of Santa Red Americana Acrylic Paint, pour out a small amount on a paper towel.
Next, add an equal amount of Dawn dish soap and mix thoroughly using your stencil brush.
Remove excess paint from the brush by swirling it repeatedly on a stack of paper towels.
Too much paint on the brush will result in bleeding underneath the stencil.
To apply the color, stipple the paint/soap mixture through the stencil.
Now, remove the tape before adding the next color.
Stenciling the Green Elements


***If you continue to use the tape for masking, be careful that when you remove the tape you don't also remove the paint you've already applied.
Now repeat the above steps using Mistletoe paint and paint all of the green stencil elements. Mix the color with the dish soap as described earlier.
Stenciling the White Features


Next up is white paint mixed with Dawn for the cuff of the stocking.
Stenciling the Gold Ribbon


Switch to Metallic Gold mixed with dish soap for one of the ribbons
Stenciling the Silver Ribbon


For the other ribbon, try Metallic Silver mixed with Dawn.
Once finished stenciling, simply remove the tape and peel back the stencil!

Using SnowFrost to Stencil the Window


Another option for window stenciling is to use some Santa SnowFrost.
For divided-lite windows, use scissors to seperate the different stocking designs.
Use repositionable spray adhesive and Frog Tape and affix as discussed earlier.
Masking and Stenciling


Next, cut pieces of newspaper and tape in place to protect the areas around the stencil from overspray.
Ensure that all of the paper lays flat against the window.
Provide some ventilation using a fan and open window and shake the can of SnowFrost well.
Spray a couple of bursts onto some scrap newspaper to remove any liquid that remains inside the nozzle.
Apply the spray in light, even coats.
Once complete, remove the paper and stencils and voilà!
Your new windows stencils shine like a beacon of festive light for all the neighborhood to see.
(Cleanup is easy for both stencil medium - simply wipe off using a damp cloth.)